Mission Entertainment Center
These wood working plans include:
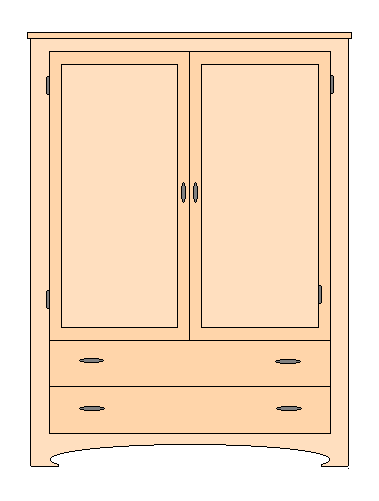
The detailed drawings of: the Front and Side Elevation giving the dimensions of the unit; Details of a router jig to cut dadoes.
The plans have a List of Materials, showing a breakdown of materials for the Mission Entertainment Center.
The Instructions include cutting a sheet of plywood straight without a table saw using a guide. How to make a router jig for cutting dadoes for shelves, make panel doors, make drawers and assemble the drawer slides.
List of Materials
- 1 sheet 4'x8'x1/4" oak plywood for door panels
- 1 1/2 sheets 4'x8'x1/2" oak plywood for back and drawer bottoms
- 2 1/2 sheets 4'x8'x3/4" oak plywood for sides and shelves
- 1 piece 1x4x5' oak
- 2 pieces 1x6x4' oak
- 3 pieces 1x6x6' oak face frame
- 2 pieces 1x8x4' oak for drawer fronts
- 1 lb. 1 1/2" bright finish nails
- 1 pint carpenter's yellow wood glue
- 6 - brass plated shelf rests
- 2 pairs door hinges - 3/8" overlap, self closing
- 6 - door/drawer pulls
- 2 pairs 22" drawer slides, bottom mount
- 1 box # 6x 5/8" flat head wood screws for drawer slides
- 6 door and drawer bumpers
Instructions
Start with cutting out the sides of the mission entertainment center from a full sheet of plywood.
If you don't have a table saw that will do this, use your circular saw as follows.
Get a straight piece (factory edge) of 1/4"-3/4" plywood about 3" wide by 8' long to use for your edge guide. Measure your circular saw from the base plate to the inside of the teeth on the blade, this is the amount you need to set from your edge guide to the cut mark on the piece of plywood you are cutting.
Start by cutting the two side pieces at 23 1/4" wide by 72" long. Always get in the habit of putting the edge guide on the piece to be cut. Set the edge guide up on the plywood, clamped on with C-clamps at the ends. Keep the clamps small so the saw motor will clear them. Lift the blade up to give more clearance. Also with a circular saw, always have the best side down. As the blade turns the teeth will chip the top side. On a table saw this is the opposite, always rip or crosscut with the good side up. Practice on some scrap material until you know the exact setting for the edge guide. It may be a good idea to make a jig for cutting small pieces or cutting a 4' sheet of plywood in half. Get a piece of 1/2" plywood ripped about 2" wider than your base plate to blade measurement and 4' long. Screw onto the left side of it a 1/4"-1/2" by 1 1/2" piece of ripping the same length (4'). Keep this perfectly straight. Now with your circular saw, rip the right side down when keeping the base plate tight to the 1 1/2" ripping. Now you can put this edge guide up against the mark to be cut on a sheet of plywood. You can make one for the 8' ripping as well.
Tip: If you are cutting on saw horses, it is a good idea to set the depth of the blade just below the surface you are cutting to avoid too much damage to the saw horses. It is also easier on the saw.
Since you need two pieces of 23 1/4"x72" for the mission entertainment center, cut the 72" first, then both pieces will be the same length. If you have a table saw without extensions, after the first piece is ripped using the edge guide and circular saw, the second piece can be ripped on the table saw by cutting off the excess piece. That is, if the piece remaining is 24 5/8" rip off 1 3/8" from the back side of the blade, leaving 23 1/4". Be accurate with your measurements.
Now let's layout these two sides, just as shown on the drawing of the mission entertainment center.
Cut the kick space shape at the bottom. Come in about 6" from each end to start the profile, use your imagination for the shape you like. Don't come up more than 2" from the bottom. Use a jig saw to cut out the desired shape. Trace the shape on the other side and cut it out, too.
Tip: When tracing opposite sides, always place the good side of the two pieces together.
Starting at the top, go down 3/4" and mark it 24" ,3/4", etc just as it shows on the drawing. Make sure you come out at the bottom correctly.
Now make a jig for your router.
Rip two pieces of 3/4" plywood, not oak but fir or cheaper, preferably scrap, 3"x36" and two pieces 3"x16". Measure the base plate diameter on the router. Make a box with the short pieces on top of the long pieces, as shown. X equals the measurement of your baseplate plus 1/4". Use a 1/2" router bit. When the router is guided by the long pieces, it will make a 3/4" dado. Try it out on a piece of scrap and adjust the width to suit your 3/4" plywood for ease of fit, not too tight, yet not too loose. Mark the edge of the dado in relation to the edge of the guide and use this measurement when setting up to rout your dados on the side. Remember when laying out the dados, lay them out on the worst side of the sheet of plywood and as a mirror image to each other. These dados should be exactly 1/4" deep.
Notice the two short "shelves" at the bottom of the drawings of the mission entertainment center. These are for drawer rails and should be dadoed out only about 3" in length from the front. The adjustable shelf, of course, does not have a dado. This is just for location and placement of the holes for the shelf rests. Since this is a custom piece try to determine where the best location for this shelf is to match your particular TV or stereo, etc. Be careful drilling these holes so you don't go right through. Drill about 3/8" deep, use a stop or masking tape on the drill to let you know when the depth is reached. The top dado is flush with the top of the side, so the guide will be hanging off the side. Just put a 3/4" piece of plywood under it to support it. When using this router guide, make sure you clamp it securely, using blocks to protect the finish of the plywood.
Notice the back is also dadoed in 1/4". Just use your saw edge guide for a guide since this is a 1/2" dado and not 3/4" or allow a different measurement with your router guide. Nothing dadoed out for the front, these pieces will be nailed on the face of the mission entertainment center.
If the dados were cut exactly 1/4" deep then the following measurements for the shelves and top should fit. Cut the top 23 1/4"x47", the top shelf 22 5/8"x47" finished, including either a taped edging or wood edging glued and nailed to the front. So, allowing for that thickness, the adjustable shelf finished—including edging—is 22 5/8"x46 7/16". The bottom shelf will have the face frame over it so requires no edging. Cut it 22 3/4"x47" and then finally cut the two drawer rails 3"x47".
Assemble these parts as shown on the drawing. Start with the back. Lay the gable sides on the floor. Apply glue and nail through the back into the sides with 1 1/2" finish nails so the nails won't show from the sides. Then work your way down, assembling the top similar to the sides, nailing from the top down into the sides. Just watch the angle of the nails to keep them from protruding out the face of the side. Leave the adjustable shelf out for now. Nail and glue the back into the top and stationary shelves.
Lay the mission entertainment center on its back and make sure it is square by measuring the diagonals. It should be if the back was square. From the solid boards, rip the face frame according to the drawings and glue and assemble. These are face nailed into the sides and shelves, etc. The nails are set and filled to match your finish. When the entire face frame is glued and nailed, this is the time to sand the edges smooth. The kick is part of the bottom rail that goes over the bottom drawer rail, so cut that out before nailing it in position.
Let's make up the doors next. These are made of rippings of solid material dadoed out to receive a 1/4" thick panel. Rip the frame 2" wide; four pieces for the sides 50 3/4" and four pieces for the tops and bottoms of 17 15/16". Cut a dado on the inside of each of the pieces for the tops and bottoms and cut a blind dado on the sides. A blind dado is a dado that doesn't carry through to the end of the piece, but stops short, so you can't see it from the bottom or top. The simplest way to do a blind dado is on the table saw and mark the start and end of the blade on a piece of masking tape about 13/16" above the table face on the rip fence. Then put marks on your piece where you want the dado to end. When ripping the dado stop the cut when these marks line up. The dado should be 1/4" deep and 1/4" wide for the panels to lay into. Measure the required panel size, it should be 18 7/16"x47 1/4". Assemble the pieces together with glue and biscuits if available. The panel should be flush on the inside of the frame pieces. Nail on over this joint, on the inside, a small half-round trim to hide the joint.
Install the hinges to the back side of the doors, about 3" from the top and bottom to the center of the hinge. Install the doors on the face frame. The bottom of the doors should be 1/4" down from the top of the 3/4" face frame on the bottom shelf. When fitting the doors in place, you'll notice that if pressure is applied to the hinge side, measurements to center the door on the unit vertically will be easier. There should be about 1/8" between doors and 2" showing on each side of the face frame.
Now measure the distance of the two doors across the bottom. This should match the width of the drawer fronts on the mission entertainment center, which should be 7 1/4"x44".
Now let's attach the drawer slides to the gables as well. Notice the set of slides have a R and L stamped onto them for right and left. The two pieces with the angle is for the bottom of the drawer. Their matching counterparts mount on the gables at the right or left position. Mount these with #6x5/8" wood screws on the bottom of the gables marked for the drawers, lay them on top of the face frame rail and keep them square with the side. Notice that the roller is mounted at the front and the slide is flush with the front of the face frame.
Okay, now for the drawers of the mission entertainment center. We must allow 1/2" on either side of the face frame opening for the slides so this makes the drawers 1" smaller than this opening, or 42 1/2" wide and the depth is 22". Measure the height of the drawer opening and subtract 3/4" leaving a height of 6". The drawer pieces should be as follows: 4 pieces 5 1/2"x22" for sides, 4 pieces of 5 1/2 "x41 1/2 " for the front and back and 2 pieces 22"x42 1/2 " for the bottoms. Cut the bottoms out of 1/2" plywood. Dado the sides on each end to receive the back and front 1/4" deep. The bottom is glued and screwed into the sides, front and back. Install the drawer slide onto the bottom of the drawer, with the roller at the back. Keep the front of the slide flush with the front of the drawer. Install the drawer into the slides by inserting the roller into the slide and tipping the drawer up. For removing the drawer, slide it out and tip the drawer up again to clear the roller. The drawer should roll smoothly.
Tip: If the drawer is slightly too large for the opening and is binding on the sides, remove the slide on the left side of the drawer and with the table saw remove a thin slice the height of the slide off the drawer side. It is better to be 1/16" too small than too large.
Install the drawer faces on the front of the drawer by screwing them from the inside of the drawer. Drill four holes in the front of the drawer, along its length and centered. Use the correct length screws to prevent them from protruding out the face. Tighten up two screws at first, then adjust the fit if needed. When happy with the fit, screw in the remaining two screws.
Drill the holes for the pulls on the doors and drawers of the mission entertainment center, using a 3/16" bit.
Tip: When drilling the holes for the pulls, always use a small backing block held against the inside of the drawer or door. This prevents the drill from chipping the wood when going out the other side.
Install a 3/4"x3/4" trim around the top, sides and front. Miter the joints at the front. An alternative to this trim is to install a nice profile such as a small crown molding here.
Stain or finish as desired and install the pulls and adjustable shelf.
There you have your mission entertainment center. Enjoy!
Dave
(Ask Dave) (About Dave)Your source for building tips, woodworking & furniture plans, house plans and building advice directly from Dave...
Hi, I'm Dave Osborne. With over 50 years experience as a journeyman carpenter, foreman and contractor in heavy construction I enjoyed working with apprentices and sharing the tricks of the trade that others shared with me. Now I get emails from Members all over the world and we include many of my answers in our Free Monthly Newsletters. Some of my answers include drawings and instructions specific to a project, but may also answer your questions. I use correct construction terminology, so you can confidently inform your building supply dealers or contractors exactly what you need.
ASK DAVE!
The Benefits of Membership
Membership gives you full access to our hundreds of how-to articles, woodworking plans, converters, calculators and tables. Our Stair Calculator is one of the most popular on the internet. We have projects you can build for (and with) your kids, furniture for your wife, and sheds and gazebos. If you run into a problem or need advice your Membership includes unlimited email questions to me through our Ask Dave quick response button.
Join us!
Copyright © 1999-2025 DDFM Enterprises. All Rights Reserved. DDFM ENTERPRISES, DAVE'S SHOP TALK and the Dave Osborne logo are trademarks and service marks owned by DDFM Enterprises. All other trademarks on this site are the property of their respective owners. Site design by Design Strategies, Inc.