| NEWSLETTER from DaveOsborne.com | ||
| “Building Confidence” | April 2008 | |
Welcome
Welcome to our new members to our website as well as this newsletter. Hope the weather will improve so we can all get on our projects.
Ask Away!
Here are some of the questions and answers for April:
Dave,
I am making a Home theatre downstairs and need to make square
decorative columns. Do you have any plans for these?
Some thing simple?
Kuldip
Hi Kuldip,
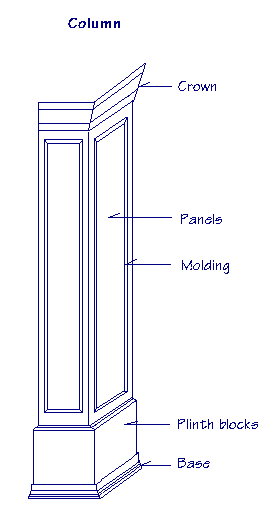 Start off with dimension lumber, 2x4, 2x6, etc. to get the approximate size, 6x6 for example. Then cover the frame with 3/4" MDF. If you have a table saw, mitre the edges, so it looks like one piece. Then install MDF panels with molding as in this drawing:
The panels can either be inset below the surface of the column or outset above the surface of the column depending on which way you install the MDF.
- Outset: the MDF is cut to the shape of the panel, as shown, then installed with molding around it.
- Inset: the MDF is cut into mitred strips, which are attached to the edges of the column with molding on the inside of them. This is where you use your imagination and artist abilities.
Dave
I am installing a handrail on my landing and down the stairs.
Your instructions given on how to do this includes everything
I need except how to attach the handrail to the newel posts.
Could you explain how to do that?
This is what I wrote in the article to fasten the top rail to the newel post: Put the whole assembly into position, pre-drill for wood screws from the top rail into the newel on the angle, use glue on all joints. There are small headed, hard screws available for this purpose at the finishing store.
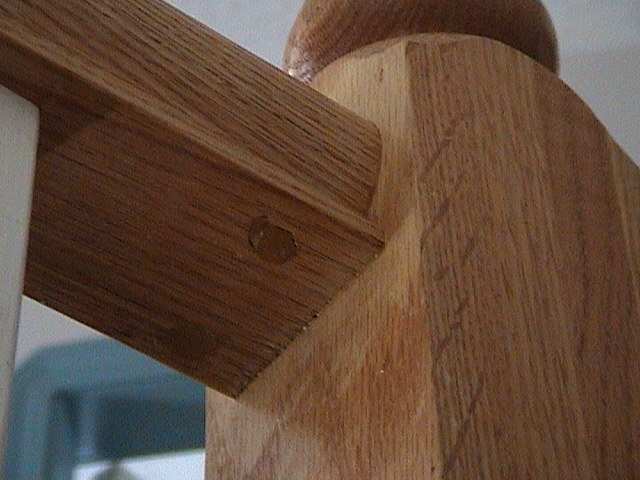
Notice the 2 holes filled with putty on the underside of the top rail, in the above picture. This is where the screws are used to attach the 2 pieces. Use the screws as you would a toe-nail - on the angle from the rail into the newel. You should have enough room between the spindle and the newel post. These screws are 3" long with a very small head and are very hard for screwing into oak or other hardwoods. A standard 3" x # 10 flat head wood screw would work, but the head is larger and you would have to pre-drill into the newel. Make sure the end of the rail is completely covered with Carpenter's Yellow glue, then wipe the excess off with a damp rag after tightening the screws.
When going down the stairs, the top rail is installed first, before the spindles. The lower newel and rail are attached as described above. The upper newel and top rail are attached from the face of the top rail into the newel. Unfortunately, this leaves a hole that needs to be plugged rather than puttied, since it is in full view. Usually, a 3/8" hardwood plug is used to fill a 3/8" hole in the rail, as shown in this picture, below.
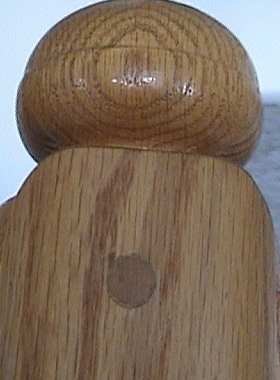
I would recommend buying a 3/8" plug cutter, an inexpensive tool. This way you can make your own plugs out of scraps of the particular hardwood you are using for instances such as this.
Hope this clears up any confusion,
Dave
I am in the process of installing kitchen cabinets. The first side of
wall cabinets went smooth.I started with a corner cabinet and went out
from there.On the other side of the window on other side of kitchen I
have to install another corner wall cabinet. The problem is the corner is
not square or plumb like the other side. It is out of square by about 3/8
inch. The corner cabinet will be in the corner then a 12 inch cabinet
next to it then the window is right there on the left hand side then on
the other side of corner cabinet the wall is 8 foot and will be several
wall cabinets. How do I deal with the out of square and out of plumb
wall? Is it better to turn corner cabinet towards 8 foot wall(right hand
side) and shim cabinet on the wall where there will only be one 12 inch
cabinet on the side of next to the window or should I split the
difference on each side? And place molding on wall to cover gap or if I
split difference on both sides I can caulk. Please help with your ideas
or comments. I appreciate your site/very informative. I just renewed for
second year. I hope this makes sense.
When installing cabinets you should install them to a level line, marked on the wall. When installing wall cabinets the level line is marked at the bottom of the cabinets. Install the cabinets to this line and shim where necessary.
When installing the base cabinets the level line is marked on the top and the base of the cabinet is scribed or shimmed to fit the floor.
On professional jobs they usually start with a gap up against the wall to allow for the wall being out of plumb. This gap, about 5/8" is filled after the cabinets are installed with a scriber. A scriber is a piece of material, the same as the cabinet material, and scribed to fit between the cabinet and the wall. This also gives the room required to open a door against the wall.
It is important when installing cabinets to follow a level line rather than just leveling the cabinets around the room as you go.
Dave
Dave,
Do you have any plans or do you know where I can find plans that will
help me make a router table?
Fred
Hi Fred,
My router table is a work table on the back side of my table saw. I just removed the base plate of the router and screwed it to the underside of the table. Like using the table top for a huge base plate, except upside down. The table is 3/8" plywood, not too thick. I leave the base in place under the table, most of the time, dropping the arbor when not using it. I use a 1x3 straight edge as a fence, screwed or clamped to the table top. It works great for cabinet doors when routing their edges.
You could use the shop work bench/table as a pattern for a large router table, like I have. Use either 3/8" plywood if used as a receiving table for a table saw or router the 3/4" ply or MDF to 3/8" thick under it, where the router base will fit.
I took some pictures of my router table:

This is the router table setup behind my table saw. I use this table primarily for ripping long boards and sheets of plywood on the saw, as well as a work table.
Notice the hole at the end of the table. When I need to router something, I attach my router base to the bottom of this table, insert the router motor and the bit comes out the hole.
I then move the piece I'm working on against the bit instead of moving the router against the piece. This way you have better control.

Here is a close up of the hole in the table where the router bit comes out.

This is the view of the underside of the table with the router base attached.

Here is the fence I use to keep the piece the right distance away from the router bit.
Hope this helps,
Dave
Well, thanks for the interest in our site and for your support. Stay safe out there.
Dave
|
home | contact | articles | plans | downloads | dictionary assurance | cancel | newsletters Copyright © 1999-2026 by David E. Osborne. All Rights Reserved.
|