Building Confidence
| Volume 17 Issue 6 ISSN 1923-7162 |

Welcome to Dave's Shop Talk's Home Improvement Newsletter of questions from our members on their construction projects, a Tip of the Month and a home remodeling article, both from our website at https://daveosborne.com.
Tip of the Month
When cutting stair stringers, remember to cut off the bottom of the stringer the thickness of the treads. The stringer is then dropped that thickness from the top floor plus 1 riser.
And a Bonus Tip:
When installing a landing in a set of stairs, set the landing height at one of the tread heights, so that the risers above the landing are the same as those below the landing.
Ask Dave!
Is there a way to use the stair calculator to design a flush mount (i.e. upper tread level with 2nd floor) stairway?
Since this is not the recommended way of building stairs, the Calculator is not designed to do the drawings for this. However, I'm designed to do this for you. Please send me the total rise, the desired run and the thickness of tread and I'll fool the Calculator into giving you the numbers. Then, I'll re-do the drawings for you.
Dave
Thanks for your offer to help! I'm looking at a run of 108", a rise of 84
5/16" (84.3125) and a tread thickness of 1 1/8" (1.125). FYI, I'm looking at a flush design since I am terminating to a 2x6 header in a truss garage
attic.
Hi Don,
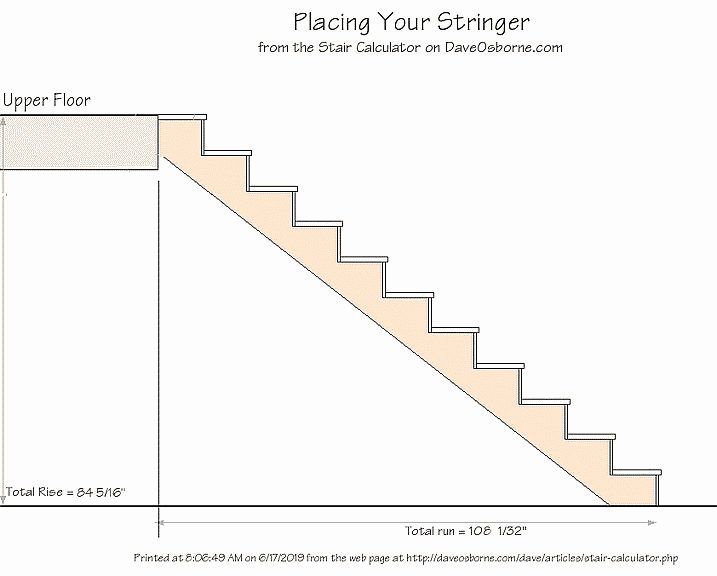
Here are the drawings, modified, to show the stringer attached flush to the upper floor, attached.
Remember to cut off the thickness of tread, 1 1/8", from the bottom of the stringer and drop it down 1 1/8" from the top of the floor.
I would add a nosing of 1" to each tread or extend the width of each tread by 1" to give a wider tread.
Dave
Stair Measurements
from Dave's Easy Stair Calculator
at DaveOsborne.com
Total Rise entered: 84.3125 inches
Floor Thickness: not entered
Number of rises: 11 rises Number of runs: 11 runs
Height of each rise: 7 21/32 inches
Length of each run: 9 13/16 inches
Total Run: 108 1/32 inches (9'-0 1/32")
Length of board needed for the stringer: 12 feet
Length of opening in upper floor: needs Floor Thickness
Tape measurements (in inches) for the stringer (see diagram):
7 3/4 20 3/16 32 21/32 45 1/8 57 9/16 70 1/32
82 15/32 94 15/16 107 13/ 119 27/32 132 5/16
Copyright © 2019 by David E. Osborne. All Rights Reserved.
Dave (taking the liberty to address you as Dave),
Thank you so much. You have gone above and beyond what might be considered "normal" customer service.
Both the speed of your responses and your willingness to help are truly exceptional.
Thank you very much.
Thanks, Don, glad I could help.
Dave
In a set of stairs, such as Don's case, where the riser of the stringer is below the box joist, an option to attach the stringers is as shown here:
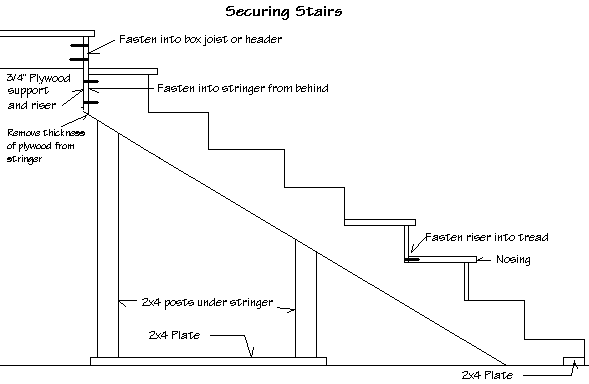
Notice the 3/4" plywood supporting the stringer to the box joist. Cut 3/4" off the riser of the stringer to allow for the thickness of the plywood. Also, notice 2x4 plate attached to the bottom floor, with the stringer notched over it. Another option I like to do when installing a 1" thick tread is to attach the bottom of the riser to the back of the tread. This helps support the tread between the stringers at the back and the riser top supports the tread at the front. If it is at all possible, install posts under the stringers to take the bounce out.
Dave
Feature Article of the Month
(taken from our website: DaveOsborne.com)
Electrical 2: How to Wire a Three Way Switch
VERY IMPORTANT! Before working on any electrical modifications of your home read the first article in this series: Electrical 1: Electrical Safety.
A three-way switch is used for turning one or more lights on or off from two different places. For example, turning the light on or off from the top of the stairs and turning it off or on at the bottom of the stairs.
The trick with wiring switches is that you only switch the black or hot wire. You'll notice that in both diagrams, the white or neutral wire goes through the switch boxes and connects to the light - it is not switched. On the 3-way switch, the white wire is used as an extra switch wire and is said to be colored black. Whenever an electrician uses a white wire as a hot wire, he/she will put black tape or colorant on it to distinguish it as a hot wire, rather than a neutral.

Notice in both diagrams that the black wire is used for switching purposes in combination with the red and white wires. The white wire connected to the three-way switch is colored black to show it is not a neutral wire. The black wire from the power source is shown connected to the three-way switch at the common terminal of both switches. This common terminal usually has a red, copper or black screw and the word COMMON stamped on the back of the switch. The other terminals usually have brass screws.
The first drawing shows the wiring of a three way switch with the power source entering the light box.
This second drawing: How to Wire a Three Way Switch Power to Switch shows the wiring for a three way switch when the power source enters one of the three way switch boxes.

Dan and I thank you for your interest and support of our Website. We hope we can help you with your present and future projects.
Get complete access to our website - Subscribe Now!
We BUILD CONFIDENCE. If you need advice on Building or on your projects at work or home you can make a very small investment and subscribe to our website, then send me any questions or uncertainties you might have via email. There is no extra charge. That is all part of your membership to our site!
Please tell your friends and family about our site and this Newsletter.
Your source for building tips, woodworking & furniture plans, house plans and building advice directly from Dave...
Hi, I'm Dave Osborne. With over 50 years experience as a journeyman carpenter, foreman and contractor in heavy construction I enjoyed working with apprentices and sharing the tricks of the trade that others shared with me. Now I get emails from Members all over the world and we include many of my answers in our Free Monthly Newsletters. Some of my answers include drawings and instructions specific to a project, but may also answer your questions. I use correct construction terminology, so you can confidently inform your building supply dealers or contractors exactly what you need.
ASK DAVE!
The Benefits of Membership
Membership gives you full access to our hundreds of how-to articles, woodworking plans, converters, calculators and tables. Our Stair Calculator is one of the most popular on the internet. We have projects you can build for (and with) your kids, furniture for your wife, and sheds and gazebos. If you run into a problem or need advice your Membership includes unlimited email questions to me through our Ask Dave quick response button.
Join us!
Copyright © 1999-2026 DDFM Enterprises. All Rights Reserved. DDFM ENTERPRISES, DAVE'S SHOP TALK and the Dave Osborne logo are trademarks and service marks owned by DDFM Enterprises. All other trademarks on this site are the property of their respective owners. Site design by Design Strategies, Inc.