| NEWSLETTER from DaveOsborne.com | ||
| “Building Confidence” | October 2007 | |
Welcome
Isn't this a beautiful time of year with the leaves changing color and the salmon spawning. Welcome to our newsletter where we discuss your construction projects and some of the questions you have had in the past month.
What's New
Frances and I just got back from a two night stay at a native resort on Quadra Island, British Columbia, Canada. We celebrated our 40th anniversary together and enjoyed some peace, quiet and relaxation.
I managed to draw plans for: a Shop Work Bench Table and a Wheelchair Ramp, both with instructions for the novice builder. I finally wrote an article on How to Install Vinyl Siding, as promised, which is up on the site now, as well. More to come...
Ask Away!
Here are the questions and answers for this month:
Hi Dave,
My name is Frank and I will be removing existing laminate flooring
and installing new laminate on my stairs. I have 3 stairs that form
a triangle (please see photo attached and complete stair case
photos here: http://fvjr.com/stairs.html).

What is the best way to layout and measure these angle cuts.

Thank you in advance for your assistance.

Frank
Hi Frank,
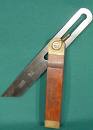 A good tool for this type of work is the bevel square. It is an adjustable bevel, as shown in this picture. In your case, the sliding bevel is brought to the end of the Tee so the arm and bevel are flush. Put this into the corner to get the required angle. Scribe it on the board to be cut. For 3 winders, such as you have, the 90 degree turn is split into 3 - 30 degree turns.
For stairs, the strips of laminate should be parallel to the nosing, as shown in your photos. Laminates do not work as well with stairs as does the 3/4" thick hardwoods. The nosing with laminates is installed over the laminate causing an awkward lump on the edge of the stair tread. With hardwoods, the nosing and the tread is flush on top of the tread. It looks to me that your original covering is not laminate, but solid hardwood.
With both systems, start at the back and come forward. Layout the ripping on the back piece so that the nosing will be over a full piece or strip of laminate, the back is cut to fit.
Refer to my article: Stairs 6: Installing Hardwood on Stairs
Dave
Hi Dave,

I am building a house in Meeting Creek, Alberta and I'm sure much like
anywhere in Canada tradesman are very hard to find. I have purchased a
"cabin" package from Home Depot and am putting it on a
footing/foundation wall with a slab floor. No basement and hydronic
radiant heat in the slab. The house is 24'x32'. Anyway, I have decided
to tackle the project myself and am not sure about a plumbing issue. I
have excavated the site and am about to construct the forms for my
footing. I'm not sure if the sewer line to the septic tank and incoming
water lines should be put down now or after the foundation is up and I
do it when all the rest of the under slab plumbing is done. Any
suggestions or tips that might help with any of this in slab plumbing
would be much appreciated. Enclosed is a floor plan.

Thanks in advance,
Reg
Hi Reg,
With a slab on grade there definitely is a plumbing issue. Actually, there is plumbing and electrical to think about at the footing stage. You know where the toilet is, so you need to figure out where the septic tank will be. At the footing stage, we usually put in block outs. A block out can be made of wood or pipe. Make it big enough to get the pipe in after the block out is removed. You will probably use a 4" ABS pipe sticking out of the foundation wall so if you make a block out out of wood make it big enough. Make it out of 3/4" solid wood rather than plywood, so it will split when stripping the forms. Make it 7 7/8" long instead of 8" so you can get the ties connected without fighting the block out.
For electrical - think about where the power is coming into the house. If it is overhead, no problem, it will come through the frame. If it will come to a pole then underground to the house, you need a block out for the power, as well.
All plumbing and heating in the slab has to be correct before the concrete is poured, obviously, so plan ahead. If you are not sure, put in block outs in the slab for the vertical rises off the main pipe. Especially for the tub, there is no guess work for a tub drain, it has to be exact.
Know where the water supply is coming from either a well or municipal service and allow for that block out, too.
Checkout my article: How to Build a House 2: The Foundation
For any specific questions, just ask.
Dave
Hey Dave got a ?? for you, when attaching lookouts to the end trusses for
your gable over hang, i was told to notch the trusses at least two to
three trusses back and then run them out to how ever far your over hang
is. I have done it this way a few times with no prob and even had
inspectors look at them and say great, but now i have a friend who has
said oh no i can not notch my engineered  trusses. OK bud what
is the right way??? Thanks. Cliff
Hi Cliff,
It has been awhile. Hope you are well.
Your friend is right, you don't notch trusses. The correct procedure is to tell the truss plant that you want a certain size overhang, anything over 16". They will drop the gable truss, usually 3 1/2", so you install your lookouts using 2x4s on edge, nailed to the inboard truss, toe-nailed over the gable truss and creating a 2' or 3', etc. overhang.
Here is a drawing to help explain:

Dave
Dave,
I'm building a gazebo and have a question about how to attach the beams
at the top of my posts. I had originally planned to attach the beams on
the outside of my posts using either lag bolts or bolting all the way
through my posts, but after seeing your gazebo plans, it appears that
you place the beams on top of the posts. Is this a better solution?
How do you attach the beams to the posts when they are placed on top?
The gazebo will be 12X16 and have a hip roof. Any help will be greatly
appreciated.

Dave W.
Hi Dave,
Placing the beams on top of the posts is structurally the best way. This way all the weight of the beams and the roof is supported on the posts, rather than bolts. Toe-nails are used to tie the beam to the posts. When the beams come to a corner such as in our Gazebo Plans, there is no problem with the beams sitting on the post. When a beam is sitting on a post and has a tendency to lean one way or the other, I usually put a scab on the beam extending down over the post, as shown:

Dave
Hi Dave, love your newsletter.

Bought a pre-hung exterior metal door from Home Depot last week and
installed it at the cabin.  It came with hinges attached to the
door jambs and sill installed etc., all ready to go.   It was just
a matter of removing the old door, clearing out the rough opening,
inserting the new door, making sure it was level on all sides,
shimming, then anchoring it in to the studs.    So simple.

When we set it in it was level on all sides but by the time we had
it shimmed it was somehow out of centre; however, it was late in
the day so we screwed it in.   When we opened the door it was obvious
that is was sagged on the door knob side (opposite of the hinge side)
by about 1/8" and it was hard to open on the bottom, it sticks.

Without removing all the foam insulation, which I'm sure will be a
pain and without removing the screws, can I just put a shim in the
bottom hinge to level the door or do I have to take it all apart?
I will likely be doing this without any help.

Also, I have another door to do.  I am thinking of setting it in
level then screwing it into the wall and installing the shims later,
so as not to lose the level position.

Any advice?

Thanks, Neil
Hi Neil,
I wrote an article on this very subject: Remodeling 17: How to Install a Pre-Hung Door
Your problem may have been the foam insulation. You have to be careful using that stuff, since it expands so much. It will move a jamb if you spray too much in there.
Shimming the bottom hinge won't help, if there is no clearance at the bottom side. Your best bet would be to start over. Remove the foam with a handsaw with a vacuum sucking it up. Remove the shim on the hinge side and de-do. The best place to hold the level is on the door edge, with the door almost closed. Get the hinge side plumbed correctly, first, with enough clearance on the latch side to shut the door. Keep the same margins on each side and on the top. These days they hang a door with lots of clearance on the latch side so you don't need to bevel the edge.
Another option you have if you don't want to start over is to fit the door to the jamb. It means removing the door from the hinge pins and planing off a bit of the bottom of the door where it rubs the jamb. A belt sander works if you don't have a jack plane.
Let me know how you make out,
Dave
Dave, I am installing Hardie Board siding on the gable ends of my shed.
The directions call for scoring, or cutting with a special blade.   Any
experience with what works best (and if scoring, score on which side?),
or are there other ways?

Also, any preference as to whether to nail with open or blind nailing?

George
Hi George,
Always score on the front side. Also always have the manufactured ends together and the scored end at the corner, under the corner boards, if at all possible. You can cut this with a carbide blade, but it ruins the blade and creates lots of dust. They also have an electric shear you can rent for Hardie Plank. A diamond blade, at a greater cost, is also available. Blind nail under the lap of the upper board, except at a joint. Face nail on each side of the joint with a galvanized box nail, etc.
Dave
Thanks!  Almost all my cuts will be at about 70 degree angles (up in the
gable).  Will scoring still work?
George
For ripping long cuts like for siding a gable, I would sacrifice a carbide blade on my circular saw. Be sure to wear ear and eye protection, stay out of the dust cloud as much as possible. After the job, blow the saw out good.
Scoring is suggested for across the width of the plank.
Dave
Hi Dave,
My son lives in Hampton VA, and I'm helping him build a picket fence.
He will have a 10' gate across his driveway. For it to open inward, he's
facing an incline of probably 5" over the 5' of each section of the
gate. Is there a way to hinge the gate so it will not only swing back ,
but also swing up?
Thanks,
Bob
Hi Bob,
This is a real brain teaser. There are electric gates that lift and open towards a slope.
For a manual hinge to do this it would have to have a barrel type hinge - Pipe and pin. The pin would have to be 5" longer than the two barrels, so it can lift. You need a cam to lift the gate as it swings 90 degrees. It would be like a screw thread, but the lift has to happen in 90 degrees.
Another way would be to have a wheel on the slope right close to the hinge, as described above. As the gate is swung its 90 degree the wheel would ride up a ramp, lifting the gate with it. For a 5' wide gate this would have to be strong enough to lift the weight of the gate.
In a situation like this you may want to consider the gate opening out, down the slope. Coming in or out, the gate will open out half the time, anyway.
Hope these ideas help,
Dave
Hi Dave, I'm building a wheelchair ramp in Metchosin and have just
read your article with the very helpful code information.
What's the fastest construction method  to use ie 2x6 framing
with 3/4" PT plywood? What's the best non-slip coating to use?
Hi Steve,
I would build it out of treated 2x4 joists and posts and pads and 3/4" PT plywood. You could use an asphalt rolled roofing for grip or a floor enamel with silica sand or crushed walnuts, mixed in.
Here are 2 drawings for you:
[these drawings are in the Wheelchair Ramp Plans]
Don't just support structural members with nails or screws. Always support these members with 2x4s, etc. such as shown for the ledger support.
The posts supporting the joists are doubled, that is the 2x4 under the joist and the 2x4 extending up to support the handrail.
You can stiffen the handrail posts at the bottom of the ramp by embedding in a hole in the ground filled with concrete or at corners if there are landings.
The cross braces at the bottom stiffen the posts as well as the handrails.
Dave
Note: This Plan is on the website now at: http://daveosborne.com/dave/projects/wheel-chair-ramp.php
Hi Dave, My name is Allan from Perth, Ontario.
Wondering what dimensional lumber to use so as to replace the frames
in several basement windows which are badly rotted from moisture and
weather. The basement is made of stone rubble in the 150 year old house.
I hope to get this done before the weather worsens as I still have the
screens in the windows.
What kind of wood should be used as I hope I do not have to do this
again in my lifetime and any installation tips
would be appreciated.
Thx  A
Hi Allan,
I heard about your warm weather in Ontario!!
Fir or spruce are the common species of lumber easily available. Don't let the wood touch the concrete or stone, staple some roofing felt or better still some sill gasket to the underside of the frame. Window jambs are made of yellow cedar, douglas fir among others in my area.
Always seal exterior wood with either an oil based stain or acrylic latex paint.
The exterior sill of wood windows should have a slight (7 degree) slope to shed water off.
Dave
Dave:

I have a newly installed set of Loewen wooden windows and doors
that arrived with vertical grain fir unfinished on the inside
(the outside is clad in metal).  My question generally relates
to my options with respect to finishing the wood.  I'd like a
smooth  satin finish with as little gloss as possible, and I
have been vacillating between a polyurethane type of finish and
one of the oils - either tung or danish oil. My preference would
be one of the oils, but I seem to find people using them more
for furniture than finishing carpentry.   I am happy to have the
wood deepen in colour over time as it is exposed to sunlight
- such patina will make our home more comfortable over time,
but I don't want to be disappointed in my choice in the long term,
and I don't want to have a maintenance nightmare on my hands.

The issues as I see them are these:

Appearance - the oils have less sheen, and make the grain look
best
Maintenance - the oils may require reapplication more frequently
than polyurethane, but the application is also relatively easy
Waterproof - the oils are less waterproof than polyurethane
UV - All seem to protect to some degree against UV.
Or so they say.

So, my questions are:

Can you give me your general opinion of these oils in this
application?
We also have a bathing room with an open shower and large tub,
which has several windows that will get occasional water directly
upon them.  Would I be foolish to use one of the oils in there?
I don't really know what damage UV does - can you explain this?

Thanks,

Peter
Hi Peter,
Yes, the oils mentioned are used more for fine furniture finishing. They don't have as hard a finish as urethane. I would go more with a polyurethane. My favourite is Varathane Professional Finish. It dries quickly allowing more coats in a shorter span of time. It comes in a satin finish and brings the grain out as well as the oils. For re-applying varathane, just a slight sanding to remove any gloss is all that is necessary.
UV is a very disruptive radiation that will break down finishes and the actual fibres in wood, etc.
Varathane would be a better choice for the bathroom. Varathane also gives better protection on surfaces used for alcoholic drinks rather than oil alone.
Dave
I hope the answers to these questions may help with some of your questions that you may be having.
We're getting pretty well known and there are not enough hours in the day to answer everybody's questions, so Dan set up my computer with software to restrict questions to only our Foreman members of our website. I'm sure you can appreciate the fact that I need my 6 hours of sleep per night. Thanks for your consideration and your support of our website. [Update December 2009 -- this is no longer applicable. Dave found out how to get by on 2 hours sleep and questions to him are available to ALL members now.]
Dave
|
home | contact | articles | plans | downloads | dictionary assurance | cancel | newsletters Copyright © 1999-2026 by David E. Osborne. All Rights Reserved.
|